Thursday, 11 September 2014

It's here too!...


The Fall 2014 issue of Quilter's Connection magazine is here!  On the front cover is local pattern designer and free motion quilter, Karen Neary's spectacular New York, New York quilt! ( kind of poignant to be posting on today- Sept 11th ) 

Peeking out from behind those magazine covers is the actual quilt.  That's a really proud feeling for this quilt shop owner.  It's pretty neat to have both these on display together!  Remember, you could win this quilt for $10 on the NS Fibrefest draw in Oct or now....with the magazine, you have the ability to make one like it! 


Friday, 5 September 2014

It's here!...

This lovely quilt by local and internationally renowned quilter, Karen Neary, is actually here at Mrs P's! 


It's also the cover quilt of the Fall 2014 Quilter's Connection magazine....meaning that the pattern to create this luscious, New York Beauty quilt is inside.  The magazine is travelling at Canda Post speed towards Mrs P's and hopefully the print copies will be here next week.  If you do not want to wait or do not have access to this great CANADIAN quilting magazine! it can be downloaded from their site. www.quiltersconnection.ca    http://quiltersconnection.ca ( not sure the links will work but you can copy and paste if necessary) 

 
Their magazine cover!  It's so pretty. The coolest part is, Karen has graciously allowed this quilt to be part of the prizes to be awarded in the Nova Scotia Fibre Arts Festival Pin-It draw.  The tickets may be purchased at a variety of fibre places around town ( and yes, Mrs P's has the tickets for sale :) 

The money raised goes back into The FAF ( Fibre Arts Festival) budget.  Tickets are $10 each but you may also win one of 11 other prizes.  The quilt  is one of 2 Grand Prizes!  The other is a trip for 2 to New York City via Showcase Production Tours ( also from Amherst).  You will stay at the Muse Hotel and I think it is tour C-1 that you are on.  www.showcaseproductions.ca and pick the tour, Christmas on Broadway.   Mrs Pugsley's Emporium Inc is very happy to offer this as a prize on the ticket.

 http://www.showcaseproductions.ca/Theatre%20Tours/2014%20Tours%20PDFs/Brochure-Christmas-on-Broadway-2014.pdf

The tour is in recognition of Karen's other project, a new book! It's a book on New York Beauty Blocks and it's cover will look like this...


Mrs P's is hoping to launch this book as part of the FAF 2014 celebrations.  It really depends if the book is back from the printers and it up to the publisher not the author, so we live in hope it will work for FAF. 

I want people to understand, Karen has put a lot of hard work and energy into making all these things happen together to give the Nova Scotia Fibre Arts Festival, this kind of publicity.  Writing a book on any scale is a daunting project, but to make a pattern book and have people actually make your samples and give you imput back to help tweak the pattern for the book and still keep it on track is amazing.  There's also the, 'wow, look what I created', but because you are under contract to the book publisher, you cannot show your work!   To a hugely talented artist as Karen, that had to be the worst part.  

In addition to these accomplishments, Karen had a run on Craftsy.com ( an American based crafting site) where her Rhythmic pattern was the number one seller for a week or more.


You certainly need to be a dedicated business women to create this much hype and deliver! 

Kudos Karen- you have worked hard this past year and hopefully this fall, all that hard work will deliver your book when you want it!  

I'm so looking forward to the fun and creativity in the book!  

Yes, this post is all about singing Karen's praises and recognizing what a moving force she is for both the Nova Scotia Fibre Arts Festival and the quilting world in general.  Awesome! Awesome! 

For more on this proffesional quilt designer and artist, her web site is located at www3.ns.sympatico.ca/sewkaren/

...And her quilt sparked me back to blogging, which I've been terrible at over the summer.  Mrs P's is also on twitter occasionally under @MrsPsAmherst  ... 


Saturday, 23 August 2014

Be an exhibitor! ....

If you've never taken anything to your local fair or exhibition to be judged, then this post is for you.  

Exhibitions want people to come and enjoy themselves and see what has been happening in your community but they need people to exhibit their goods too!  Cumberland County Exhibition charges a modest $3 per exhibitor and you can fill your sheet up with all kinds of handiwork or just one.

Do not be afraid! All you have to do is show up at the Multipurpose building in Oxford-Sunday, August 24th (today)  in the afternoon starting around 1:30pm with your item(s) and the folks that are there will help make sure you enter in the proper classes.  

Then you wait all day Monday while the judging happens and the folks sort out all the items and display them with their ribbons.  Tuesday is when you can get back into the multipurpose building to see how you did.  If you are lucky enough to have a ribbon you can get quite giddy!  Other times, you look at your item and compare it to the prize winner and see where there are obvious things that you could do better next year.  

The sticky part is, the item will not be available to be picked up until Saturday after the building closes to the public at 8pm, although you may also pick up your item on Sunday.  If you need a different pick up date, check with the folks in the handicraft department and see if they can help.

There are over 10 sections in the Quilt Class alone to enter including; machined, group, baby panels, original designs, patchwork and more.  In the Seasonal crafts you might enter a tree skirt or wall hanging.  In Sewing there are stuffed toys, placemats, apron, clothing articles and more.  Knitting, hooked mats, embroidery and photography are all things that can be entered on the one form.  

Look around at your items you made this year and see if there is any you would be willing to exhibit!  Even if you do not have anything to exhibit this year- try to make time to check out the multipurpose building, see the exhibits, ask to see a list of classes and start planning for next year!  

Oh, I nearly forgot....prize winning for the quilt (in each section)..1st- $9.00 2nd- $7.00 3rd- $5.00 .... and you get a ribbon and bragging rights! :)  


Wednesday, 6 August 2014

Back from vacation!

I took a summer vacation for the 1st time in a long time.  I was very fortunate to have Karen Neary mind the shop while I was away.  I came home to an order all priced and set out- which was fabulous!


This line by Moda was in the order- 'The Boathouse' by Sweetwater for Moda.  It's a nautical themed fabric line and makes you think of sailing rather than beachcombing. You can almost feel the saltiness of the sea as you imagine racing along our Atlantic coast.   It's evokes the feelings of cool evenings and warm days.  Days spent enjoying the breezes off the ocean...you can hear the boats rubbing on the docks and tugging on their moorings inviting you to one more sail...


There was a special surprise in the order- the mini charm or candy square of 2&1/2 inches. It is small & full of the same charm as it's bigger siblings- just on a much smaller scale.  

I couldn't resist,...


42 squares of 'The Boathouse' laid out...Finished it would be 12 inches across the top and 14 inches long...or maybe they will be rearranged into something else....


The above pitcure shows, 10x10 layer cake, a jelly roll, 5x5 charm squares and the cute 2.5x2.5 mini charm or candy laid out on the mini charm squares.  These precuts are now currently available at Mrs Pugsley's Emporium Inc.  

You may wish to visit the Moda Bake Shop web site to see what their designers have done with the mini charms...

Sunday, 27 July 2014

The Baby Quilt...

Enough basking in the fun of having completed a project!  It is time to share how this simple, yet cute quilt was made.  This is a blog for someone who would like to quilt but not sure how to start and not even sure if they have the tools to make it with.  It's also a blog for an true quilter to remind themselves of how far they have come on their learning curve in quilting and piecing.  I have to remind all that this baby quilt was machine quilted but the binding was done by hand.  There are a couple of reasons for this- it is meant to be a simple project that can be made on your sewing machine at home and it's a baby quilt that (if used) will washed a lot- so it's functional with the machine stitching.  Hand binding is optional but I need the handing sewing practice if I am ever to learn hand quilting!  


On we go!  

First, a charm pack was selected.  This will give 40 or 42 5x5 inch squares.  I chose Brushed Cotton Storybook by Moda because I liked the feel of it.  This limited me to only 2 coordinating bolts of fabric to put a back on and a binding.  


If you are going to follow along- you need- a charm pack of your choosing (or cut 42 of the 5x5 squares out of yardage, fat quarters, cotton clothing, etc.) ; a metre for the back:  7&1/2 inches of width of fabric for the binding. 

Now you mess those lovely squares up and arrange to a look that is pleasing to your eye.  It's fine if 2 colours or patterns match but try to keep it random looking.  Note: if you have an up and down direction to the square- try to keep them all up the same way- I didn't- but you have to look to find the 'upside down' square! 


Once you've shifted them around- close your eyes or walk away and back to give yourself fresh eyes on your layout. Do you like where and what you are looking at first? Where do my eyes move next?  Just some of the questions you need to think about.  Like it? Best hint I can give you ... take a digital picture!  This is so if you need to move it- you can re-create that 'pleasing' layout again.  If you ask a friend about the layout- that's fine- safety in numbers but really- this is your project and you can do it! 

If you look, this layout is not my finished setting of squares.  I also started with 40 squares 8 down and 5 wide. Part way through, the ah, ha! moment...42 squares would be 7 long and 6 wide. 

So now, you are enjoying the layout of your squares, let's turn those 42 squares into a quilt top! 

Pick one square up and place it right sides together with another.  Put a pin the the side to sew.  You really don't need to pin to sew- but I usually end up sewing the seam on the wrong side and the piece doesn't fit back into the layout the way it came out.  Sometimes, it's for the better but usually, I spend time with the seam ripper later.  


Here's the most important tip on sewing.  Hold steady at a 1/4inch seam if you can.  Do not expect precision in perfectly aligned rows & squares if you sew a different seam width each time. If you have problems with a 1/4 inch seam- try a bigger 1/2 inch seam- the end result maybe smaller- but you may enjoy the process more. Keep aiming for the 1/4 inch seam but if this is your 1st quilt- it's not the seam size that matters- it's the consistency of having all the same seam size!  

To join blocks into their rows, I find I got lazy and didn't check my seam size...it was crooked! To fix this, I sew the 2 blocks together each time and then I add the next 2 blocks sections on until the end of the row.  

Press all the seams one way.  The next row you sew will be pressed the opposite way so the seams will 'nest' together giving a nicer finish. Quilting is slower than you think.. That's another lesson I learned.  It is not a speedy craft. The pedal on the sewing machine makes you think speed but it's really there for you to control the sewing.  Speed makes wonky seams...slow down a bit and see if that helps you control the fabric and the seam lines if you are having problems. 


Having got all the rows sewn, it will be time to attach them together!  Remember the pressing... They will fit together nicely. Pin the right sides together pinning the seams on either side. Put the pins on the side you will be sewing to make the removal of pins easier. The other thing to try is to put the seam on the top that is pressed away from you.  As you sew, you can ease the machine over the seam and keep it flat.  The one on the bottom (if pressed opposite) will be underneath and the feed dogs will make those lay flat. 


An now when the top is pressed up...


Not bad, not perfect, either....did I seam rip or leave it? I don't remember, but you are welcome to check the finished project on display at Mrs Pugsley's Emporium! 

Slowly, you piece the rows then join the rows until you have ...


A quilt top!  

Give yourself a pat on the back...you are a step closer to quilting.  You have pieced a top! 


Thursday, 10 July 2014

I did it!...

If you've checked this blog, you will see that there are a lot of projects started but none seldom completed...Today, I'm pleased to announce- Mrs P's has finished a project! 

Drum roll please....


A completed baby quilt!  A Moda charm pack  was used. That would be 42 of Storybook Brushed Cotton 5 inch squares, a metre for the back and about 10 inches of fabric for the binding.  All together with the poly cotton batting and thread about $40 retail went into this project.  

I will start posting the blogs in making the quilt tomorrow or the next day.  Today, I am basking in the awesome feeling of finishing a project!  What a feeling of accomplishment.  It's a happy dance time for Mrs P's! 

Happiness is  ... a completed quilt! 

Wednesday, 9 July 2014

Oh, Oh....

Oops!

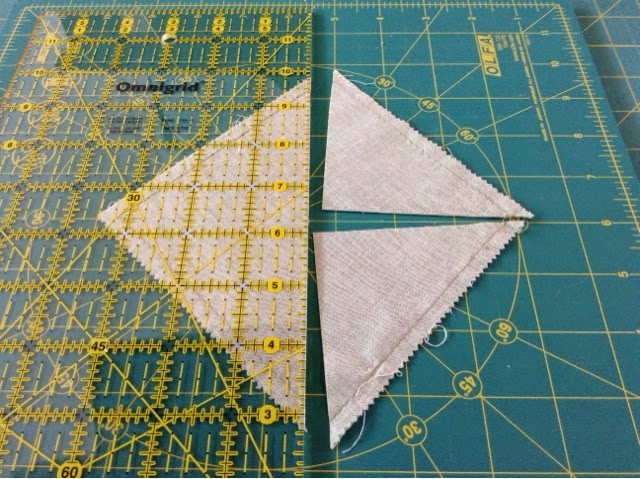
I was cutting these 'closed' squares into 4 pieces- making triangle blocks, when I wandered (wavered, veered) with my cutting blade... 


Ruining 2 out of the 4 squares.   No one was talking to me, I have no excuse, so back I went again and I made the same mistake on another set of squares!  Why?  What was I doing wrong? At this rate, I'll only have 1/2 the blocks needed!  

As you can see by the above picture, the ruler, the blade rolls against, is lying on the diagonal.  I was trying to cut along that diagonal.  I was not making the tools work for me.   Time to try again...


It's a rotary cutting mat- thought I'd be pretty good at this, but I was wrong!  I can cut straight across my table but put my arm in an odd position or stand awkward- the blade does not run true beside the ruler.  In this case, I lined the square up straight to me- where I wanted to cut- corner to corner.


See the difference using the ruler straight to me - made on the cuts?  I have 4 equal pieces...


Rotary Cutters are sharp and it doesn't take much for an accident to happen.  Be safe, install grips on your rulers, wear a safety glove or install plastic shields on your rulers.  Be alert and look for ways to reduce accidents within your workspace.  

Mrs P's does sell safety equipment for the rulers and new Olfa Blades and mats.  

My 'accident' was a piece of fabric cut wrong in the blink of an eye. It made me pay more attention to where I need to place the ruler to be safe and yet cut what I need.  Some people make cutting look easy and fast.  You need to find where and what you are comfortable with and pay attention every time you open your blade to cut.